Introduction
The following procedure will guide you through the creation of a new Eclipse project for your web app. At the end you will have a Web Project that can be run in a Java EE server (e.g. Tomcat) with all the needed layers set up and ready for customization:
-
Database access layer with transactions (Hibernate / JPA / Spring)
-
Web application controller (Spring)
-
Page templates (Thymeleaf)
-
Security (Spring)
You will also have a basic deployment procedure already set up:
-
Database schema generator
-
Configurations for development, test and production
-
Deployment script
Prerequisites
You should have Java, git, MySQL Community Server and a working copy of Eclipse IDE. Check the notes in this section before installing anything.
Java SDK
Remove any Java installation you may have on your PC.
|
Java version mismatch
The biggest problem you may face with Java installation is to mix 32 and 64 bit versions: it gives unexpected results. So always download 64 bit versions of Java and Eclipse. Currently the Yada Framework source is tested with Java 8. Running on an untested version might give weird errors. At the time of writing we failed to run on Java 11.0.6 for problems during Gradle project import. |
You should look on the Oracle site for the "Java SE" installer, which is the "Standard Edition" of Java. You will probably be required to create an Oracle account and login before being able to download. The OpenJDK version of Java should also work fine if you prefer open source software.
|
JDK vs JRE
Before Java 11 there were two components in Java SE: the JDK (Development Kit) and the JRE (Runtime Environment). Since Java 11 the JDK is also a JRE. |
The installation package will probably install both the JDK and the JRE.
The JRE - 64 bit - can be any version and generally it will auto-upgrade to the latest.
To make your installation future-proof, install the java JDK in some folder like C:\Local\Javas\jdk1.8.0_152 and
make a symbolic link to it with a generic name, like
mklink /D /J C:\Local\jdk8 C:\Local\Javas\jdk1.8.0_152Now you can refer to C:\Local\jdk8 in your scripts and when you update the java (minor) version you just change the link, not the scripts.
The Java JRE can be installed to the default folder (C:\Program Files).
GIT
Install git for your OS.
MySQL
Install MySQL Community Server v8: any later versions have not been tested yet.
For a future-proof installation you should not install MySQL as a Service, but run it manually when needed because one day you might have more than one version to use.
If you already have a MySQL installation, you may use it. Just check that the "lower_case_table_names" system variable is set to "2": if it’s not, it can’t be changed after installation so you can either reinstall, install a new instance or live with it (see below).
If you don’t have a MySQL installation already, the easiest way to install it is by downloading the "MySQL installer":
-
on the MySQL Download Page click on "MySQL Installer": you will be presented with two downloads, the smaller one is the "web installer" and it’s the one you should use. You will be asked to login or register before download but there’s also a link to download right away.
-
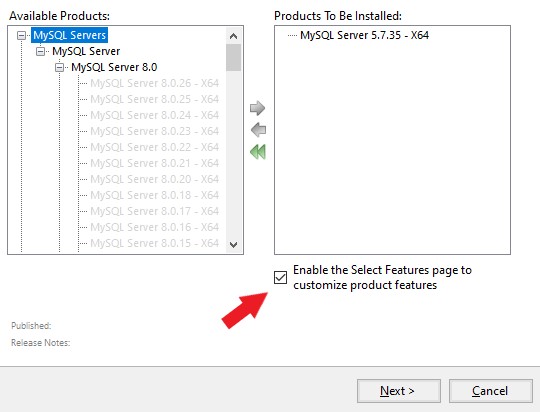
run the installer and choose the version you want to install: be sure to check the "Enable the Select Features page to customize product features" checkbox before continuing (NOTE: not sure it’s needed but do it anyway) because you’ll need to set the "lower_case_table_names" system variable before installation. If you don’t do this on Windows, you either need to uninstall and reinstall the MySQL server or ignore the "lower_case_table_names" setting, in which case you might write SQL queries that don’t work on the production Linux servers
-
when installing you will get to some wizard pages that allow to select the following:
-
"Show Advanced and Logging Options" should be checked
-
authentication method: any would do
-
root password: you may leave it blank on your development computer (do as you wish)
-
install as a service: you should not configure the server as a service if you have many versions on the same port and want to start the one you need manually (recommended approach)
-
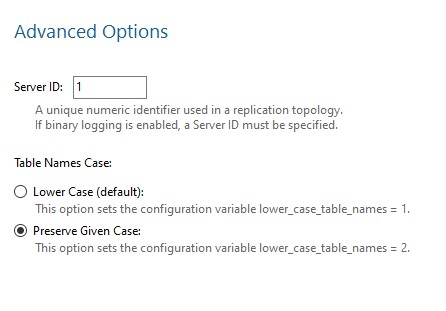
"Advanced Options": "Preserve Given Case" should be checked. This will set the "lower_case_table_names" appropriately as explained above
-
After installation, make a symbolic link to the server folder with a generic name, like
mklink /D /J C:\Local\mysql80 C:\local\Mysqls\mysql-8.0.19-winx64Now you can refer to C:\Local\mysql80 in your scripts and when you want to use a different installation
you just change the link, not the scripts.
In order to start/stop the MySQL server you should create two scripts and put their shortcut somewhere easy like the desktop or the taskbar.
set MYSQL_HOME=C:\Local\mysql80
set PATH=%MYSQL_HOME%\bin;%PATH%
C:\Local\mysql80\bin\mysqld.exe --defaults-file="%MYSQL_HOME%\my.ini" --consoleset MYSQL_HOME=C:\Local\mysql80
C:\Local\mysql80\bin\mysqladmin.exe -u root shutdownIt is very convenient to set an empty password for root on the development computer (the above script won’t work otherwise):
mysql -u root -p
SET PASSWORD FOR 'root'@'localhost' = '';
When you start MySQL you may get a few errors and warnings like "Failed to set up SSL" or "Cannot open Windows EventLog": you can safely ignore them as long as the process doesn’t stop.
Eclipse
You can edit the source files and compile the binaries in any IDE. This documentation only shows how to set up Eclipse though. You don’t actually need an IDE to develop a web application, but it can make life a lot easier compared to editing files in a generic text editor and compiling from the command line.
| Eclipse jee 2019-12-R throws a weird "VerifyError: Inconsistent stackmap frames" on some occasions. Don’t use that version. |
Install the latest version of Eclipse IDE for Enterprise Java and Web Developers. Be sure to install the 64 bit "Enterprise Java and Web" version.
|
Need Enterprise version?
A 32 bit Eclipse will not run on a 64 bit Java installation so be careful not to install the 32 bit. The non-enterprise version will not be able to run a web application in a standalone Tomcat, and it lacks some plugins that you would otherwise need to install separately. If you need a minimalistic development environment, you should be able to code with the non-enterprise version though. |
With a single installation of Eclipse you can have as many workspaces as you like. For big projects involving multiple branches and many people, you might want to create at least two workspaces, one for your own development and another one for checking other people’s work or for deployment. It is very convenient to create a different shortcut for each workspace. Using the "-data" command line option you can specify which workspace you want to use. For example:
C:\local\Eclipses\eclipse-jee-2019-09-R\eclipse.exe -data "C:\work\wspaces\myCoding"
C:\local\Eclipses\eclipse-jee-2019-09-R\eclipse.exe -data "C:\work\wspaces\myRelease"
Create a workspace for the bookstore tutorial:
C:\local\Eclipses\eclipse-jee-2019-09-R\eclipse.exe -data "C:\work\wspaces\yadaTutorial"Run Eclipse with the chosen workspace and click on the "Workbench" or "Hide" icon to the right of the "Welcome to Eclipse" page.
Update your installation with "Help > Check for Updates" and follow the instructions. Failing to do so might prevent you from adding a Tomcat server later.
From the "Window > Preferences > Gradle" dialog set the "Java home" entry to your JDK installation,
which would be C:\Local\jdk17 if you followed the instructions above.
|
Setting Gradle Java Home
When the Gradle Java Home is not set, Eclipse will run Gradle with the java version used to run itself and this may cause all sort of errors like "java facet mismatch" or "supplied phased action failed". |
Set the editors file encoding to UTF-8, at least "General > Workspace > Text file encoding" and "Web > CSS Files > Encoding":
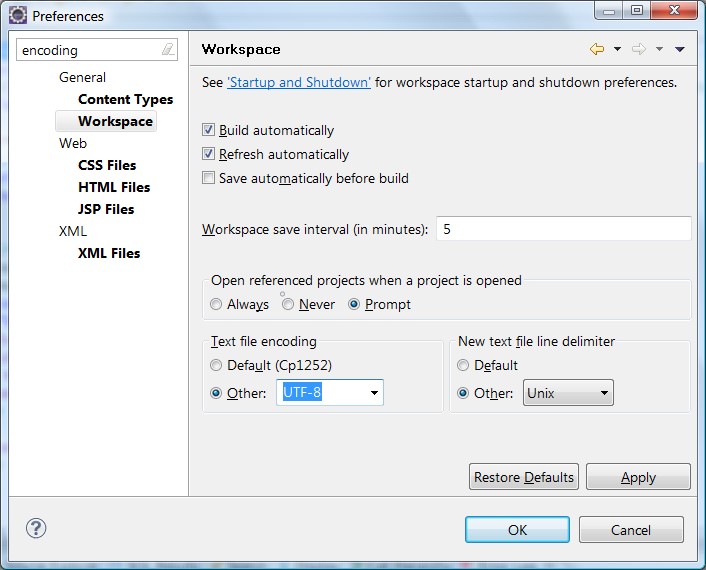
The "New text file line delimiter" shown in the above image is also better set to "Unix".
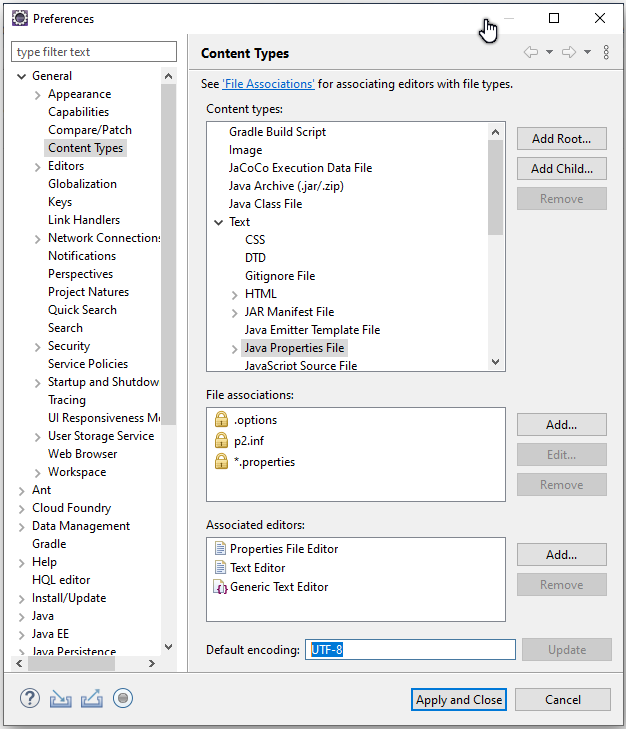
Also set UTF-8 in the "Content Types > Text > Java Properties File > Default encoding" field and be sure to click on "Update" before applying the changes:
Add the previously donwloaded JRE as a new Runtime in "Window > Preferences > Java > Installed JREs" and set it as the default. Also set the "Window > Preferences > Java > Compiler > JDK Compliance" accordingly (that would be "1.8" for Java 8).
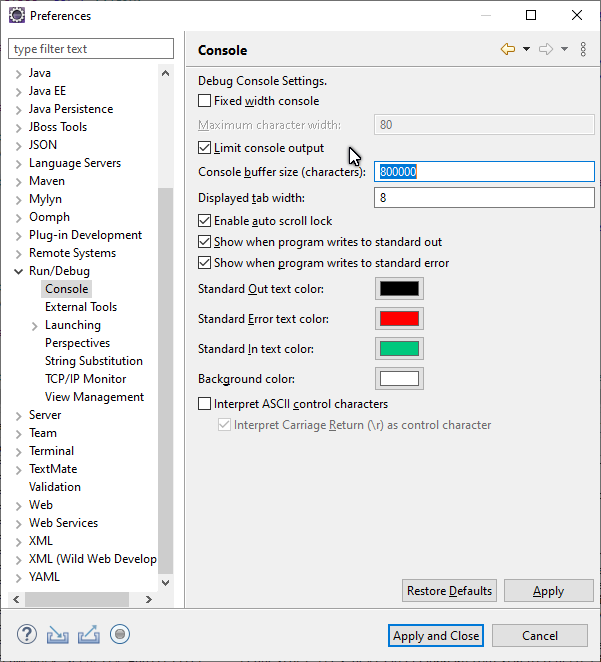
In order to better spot errors and stack traces, you should considerably increase the console output buffer or remove the limit altogether using the "Window > Preferences > Run/Debug > Console" options:
Node.js (optional)
Node.js is not strictly needed but it can be useful. Install the latest LTS version.
Connect to GIT
Add the repositories
The Yada Framework sources are hosted on the public GitHub site.
To access the GitHub repository use your GitHub credentials on the yadaframework repo.
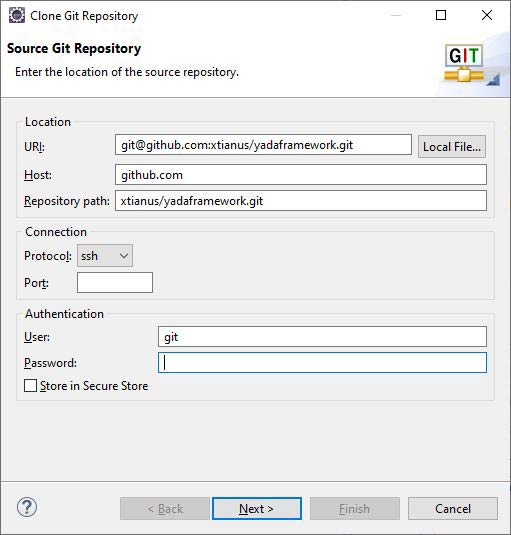
The git url should be git@github.com:xtianus/yadaframework.git.
|
Since 2021 the preferred method for connecting to GitHub is ssh. If you didn’t do so already, you should create a pair of SSH private/public keys and upload the public one to GitHub here. The keys can be generated on Windows using PuttyGen. The public one to upload to GitHub is the text shown in the "authorized_keys" box of PuttyGen. The private one to keep on your computer must be exported via the "Conversions > Export OpenSSH key" menu without a passphrase. |
Once you have the repository credentials, connect Eclipse:
-
Open the SSH2 preferences dialog from "Window > Preferences"
-
browse to the location of your private GitHub OpenSSH key

-
Open the "git perspective" from "Window > Perspective > Open Perspective"
-
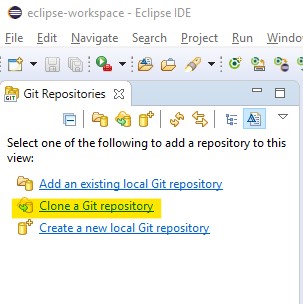
On the left of the workspace you should see the "Git Repositories" panel
-
Click on "Clone a Git repository" and add the needed information
On the "Branch Selection" dialog you should NOT select "master" but the latest versioned branch, for example "0.7.3".
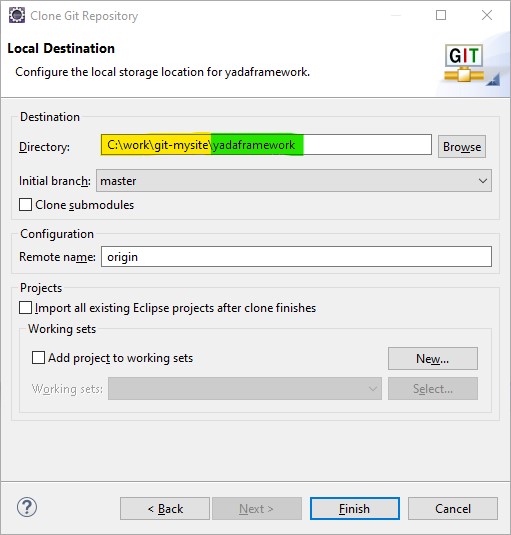
On the "Local Destination" dialog you need to select a local folder where to clone the repository.
Here we assume that you are going to create a new Eclipse project called MySiteProject (will be explained later) and
add it to a git repository called mysite.
It is very important that you store both the Yada Framework repository and your application repository in a common parent folder that is specific to the current project, for example
C:\work\git-mysite, otherwise relative paths in the build file won’t work and you’ll have to customise them.
For the bookstore example we create a common git folder called C:\work\git-yadabookstore that will contain the "yadaframework" git repo.
You should create your base git folder before proceeding. The Yada Framework will have to be cloned inside this folder, with a name of "yadaframework":
At the end, when you later also add the "mysite" git and web project, the filesystem structure will be like the following, where "mysite" is any new project that uses the Yada Framework:
C:\work\git-mysite
  mysite
    .git
    MySiteProject
  yadaframework
    .git
    docs
    YadaDocs
    YadaTools
    YadaWeb
    ... and other folders
When you have connected the yada repository, you can switch to the "Java Perspective" in Eclipse.
The First Project
Creating the Project
Create a new Eclipse Project using "File > New > Project… > Gradle > Gradle Project" menu. Use any name you like ("MySiteProject" in the above example) and accept all defaults. Two new Java projects will be created in your workspace.
For the bookstore example the project name will be YadaBookstore
|
Since Gradle 7 the wizard creates a |
The following fixProject.sh bash script can be used in order to get rid of the lib subproject:
	#!/bin/bash
	# Fix Buildship generated Eclipse project

	projectFolder=$1

	sed -i "s/include('lib')//g" $projectFolder/settings.gradle

	mv $projectFolder/lib/bin $projectFolder
	mv $projectFolder/lib/src $projectFolder
	mv $projectFolder/lib/.classpath $projectFolder
	mv $projectFolder/lib/build.gradle $projectFolder
	rm -rf $projectFolder/lib
	rm -rf $projectFolder/src/main/java/*
	rm -rf $projectFolder/src/test/java/*
You can find a version of it in YadaTools/scripts/fixProject.sh.
It should be run in the parent folder of the project passing the project folder itself as an argument:
fixProject.sh MySiteProject|
We don’t currently provide a Windows equivalent so you should run the above script under a windows version of bash.
Git for windows provides such a program in a path like |
After the project has been fixed, select the old projects in Eclipse and do a "refresh" accepting to delete the lib project when prompted.
Optional: edit the /MySiteProject/gradle/wrapper/gradle-wrapper.properties file changing the distributionUrl to match the version of
Gradle that you want to use. For example distributionUrl=https\://services.gradle.org/distributions/gradle-7.6-bin.zip.
This is only needed if the gradle you want to use is not yet available in Eclipse. Right-click the project and choose "Gradle > Refresh Gradle Project" to update the version of Gradle used.
You can choose to add an external Tomcat server or use the embedded version. In the first case, you should be using the "Enterprise" version of Eclipse. If not, you should at least install the "Eclipse Web Tools Platform" (WTP) plugin.
The bookstore application will use Tomcat embedded, so no need to install any standalone server.
Importing the YadaFramework Projects
After connecting to the GitHub repository as explained above, you can import the needed projects using the "File > Import… > Gradle > Existing Gradle Project" menu.
|
The Yada projects will be located in the git folder you chose before, not along with the new project just created. This may be confusing because the Import dialog will initially open in the workspace and you will have to browse to the git folder instead. After adding the new project to git as explained later, all projects will be found in the git folder. |
To import most Yada Framework projects at once you could just import the "YadaWebCommerce" project and rely on dependency resolution to automatically import everything else. Don’t worry about Gradle versions here: the version used will be the one configured inside the imported projects.

The YadaTools project should also be imported because you will later need to copy some files from it.
If the imported projects have any errors, first of all right-click and choose "Gradle > Refresh Gradle Project". If it complains about some unbound system library, open "Properties > Java build path > Libraries" and remove the library.
You should now have, in your workspace, the following Yada projects:
-
YadaTools
-
YadaWeb
-
YadaWebCMS
-
YadaWebCommerce
-
YadaWebSecurity
Saving to git
The next step is to create a git repository to store your projects. You must definitely use git to store your files, because after sharing the project to the repo it will be moved to the same root folder of the Yada projects so that relative paths in the build file will work effortlessly.
For a quick test, you can just create a
local repository. It must reside in the same root folder that was used when cloning Yada, that was C:\work\git-mysite
in the previous example. The name can be anything you like. Here we use 'mysite':
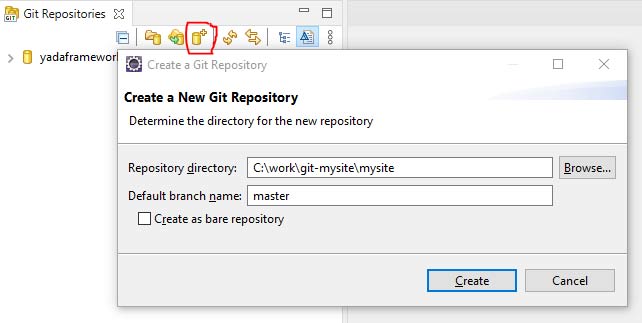
In the bookstore tutorial the git folder would be C:\work\git-yadabookstore\yadabookstore
You can also use any public provider like GitHub or a private server installation based for example on GitLab and clone the repository locally, being careful to create the correct directory tree.
When using GitLab, let it create a default readme.md file so that you’ll be able to check out the repository easily (there should be a similar option on GitHub). Then add the repository location to the Git Perspective as done for the Yada Framework.
After the repository has been added to Eclipse, to add your project to the git repository right-click on it and choose "Team > Share Project…". In the dialog you should just select the correct repository and accept the defaults. The resulting filesystem structure will be as follows:
C:\work\git-mysite
  mysite
    .git
    MySiteProject
  yadaframework
    .git
    docs
    YadaDocs
    YadaTools
    YadaWeb
    ... and other stuff
Finally edit .gitignore in the root of your project to make it look like the following:
/.gradle/
/build/
/bin/
/.gitattributes
/.settings/
/.classpath
/.project
!gradle-wrapper.jar
/.sass/
**/res/css/*.min.*
**/res/js/*.min.*
If you don’t see the file, you should change the workspace filter. Next to the "Package Explorer" title there’s a menu icon containing the "Filters…" item. Ensure that ".* resources" is NOT selected.
The Build File
Replace your build.gradle with the contents of /YadaTools/scripts/template.gradle.
The lines marked with // CHANGE THIS !!! should be edited to suit your needs.
In the bookstore tutorial we use the ybs acronym and keep all the defaults.
ext.acronym = 'ybs'
|
The Yada Framework has the concept of "environment" built in: an environment is an installation of the application. There can be a development environemnt that runs on your computer, a test environment that is deployed on a remote server and is used for testing, a production environment that is deployed on a remote serer and is used by the end users. |
The default environments are "dev" for "Development", "tst" for "Test" and "prod" for "Production".
You can rename them (or also add/remove some) using the "envs" property in the yadaInit task of the build,
but the envs array must always have the "development" environtment first and the "production" environment last
in order to create a correct configuration.xml file. For a list of all other options for the yadaInit task
see /YadaTools/src/main/groovy/net/yadaframework/tools/YadaProject.groovy
Replace your settings.gradle with the following:
rootProject.name = 'MySiteProject'
include 'YadaWeb'
project(':YadaWeb').projectDir = "../../yadaframework/YadaWeb" as File
include 'YadaWebSecurity'
project(':YadaWebSecurity').projectDir = "../../yadaframework/YadaWebSecurity" as File
include 'YadaWebCMS'
project(':YadaWebCMS').projectDir = "../../yadaframework/YadaWebCMS" as File
include 'YadaWebCommerce'
project(':YadaWebCommerce').projectDir = "../../yadaframework/YadaWebCommerce" as File
You should change the project name to whatever you used. The above assumes that you cloned the yadaframework repository in the same root folder of your project repository as explained in "Add the repositories" above. This setup is needed to use YadaWeb class files directly instead of going through the jar, and is handy when you plan to work on the YadaWeb sources to fix and improve them.
Use rootProject.name = 'YadaBookstore' for the bookstore tutorial.
Copy the /YadaTools/scripts/sass.properties file into the project folder.
Code Generation (just a bit)
Ensure you have these folders in your project before the next step, and create them when missing:
-
src/main/java -
src/main/webapp
Use the Gradle > Refresh Gradle Project project menu item to initialise the project.
Check the Elcipse console (Window > Show view > Console) to see if there are any problems.
|
If you get the error "Java compiler level does not match the version of the installed Java project facet"
you may have an inconsistent workspace, probably because you changed the default Gradle options during project creation.
Check that the file |
Open a command prompt in the root folder of your project (e.g. C:\work\git-mysite\MySiteProject) and run gradlew yadaInit --no-daemon.
For the bookstore tutorial:
cd C:\work\git-yadabookstore\yadabookstore\YadaBookstore
gradlew yadaInit --no-daemon
This task will add the java core Spring configuration and some default files that later will have to be either deleted or customised. The "--no-daemon" option is to stay on the safe side.
|
You can run the task multiple times and it will never overwrite existing files: to revert a change, delete the file and run the task again |
Refresh your project in Eclipse (F5). If you see compilation errors ensure that you’re just missing some classpath libraries and do a "Refresh Gradle Project" again. If you still have errors, try to fix them ;-) For example you might need to remove the dependency on YadaWebSeurity classes if you didn’t want to use it.
This may be a good time to commit and push to git.
Initial Customization
By default, all files used and created by the application are to be found inside the /srv/<acronym><env> root
folder,
where <acronym> is the value of ext.acronym in the build.gradle file and <env> is the "environment",
as explained in The Build File above. This folder should be manually created.
The predefined application user is (literally) admin@EXAMPLE.com with password myAppPassword.
Before starting the server for the first time, you may want to change that values by editing
the /src/main/resources/conf.webapp.dev.xml file at the <user> tag. The data is stored in the database on first startup
and never read from file again, so this is the best time to change it to your likes.
More users can still be added later: only existing users are ignored.
There are some other items that can be customized but they can wait for later:
-
configuration files
-
log configuration
-
startup actions in
Setup.java
For the YadaBookstore application, the default root folder is /srv/ybsdev. You should change the
admin user email to your own email address in order to receive emails from the application.
Database Setup
|
You can skip this section if you’re not going to use a database (yet), but also Security will be disabled. Set <database enabled="false"> in the configuration. |
The default database schema, user and password are found in /src/main/resources/conf.webapp.dev.xml, /src/main/resources/META-INF/persistence.xml, /src/main/webapp/META-INF/context.xml and
/env/dev/createDatabaseAndUser.bat. If you want to change them, do so in all files.
For the YadaBookstore application, the default values are:
schema |
ybsdbdev |
user |
ybsuserdev |
password |
mydevpwd |
To create the database and user, run the /env/dev/createDatabaseAndUser.bat
(if you’re not on windows, just copy the content and adapt it to your platform).
On Windows you can open a cmd window and drag the file there from Eclipse, then just press Enter.
If all goes well, you can now generate an initial schema by running the dbSchema gradle task. The schema
will be derived from the classes listed in /src/main/resources/META-INF/persistence.xml so, to simplify the schema,
you may revise this file and remove any unneeded classes. You will always be able to remove/add a class later
though you will have to manually delete the removed classes from the database too.
As you will be generating a new schema often, you should create a "Run Configuration" in Eclipse to generate the schema. Click on "Run > Run Configurations… > Gradle Task" then press the "New launch configuration" icon. A new configuration called "New_configuration" will be created. Change the name to anything you like, for example "MySiteProject - DB Schema", add a Gradle Task named "dbSchema", set your application project as the Working Directory, then in the "Common" tab choose "Save as > Shared file" and type "\MySiteProject\Launches"
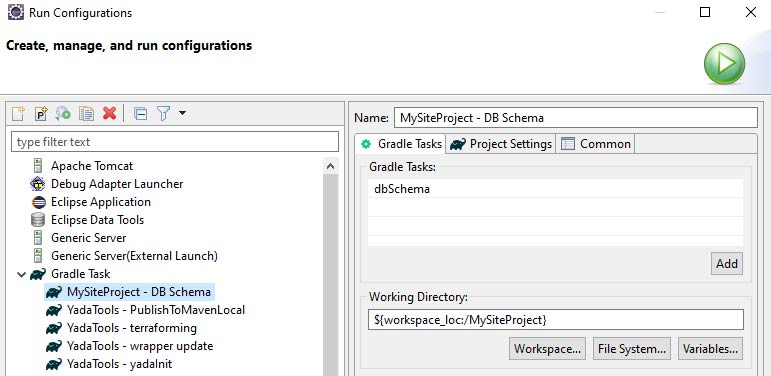
You can now run the schema creation task with a press of a button.
You may get some compilation errors that need to be fixed before trying the generation again.
If the schema generator can’t connect to the database check that all configuration files listed above (persistence.xml etc.) have the correct DB login credentials.
If all goes well, the output will be written to the /schema folder (you might need to refresh it in Eclipse with F5).
To load the schema into the database you may use the /env/dev/dropAndCreateDatabase.bat
script (or an equivalent linux/mac version) but it is more convenient to have the schema loaded
by Flyway at first application run: just copy it in the /src/main/resources/database folder with a name like V001__baseline.sql.
Tomcat server
This section is about setting up a standalone Tomcat server that can be controlled from Eclipse.
|
You can skip this section if you’re going to use the embedded version of Tomcat (recommended option for a generic use case). |
Skip this section for the bookstore tutorial.
Download Apache Tomcat 8.5 "64-bit Windows zip" and unzip the folder to some place like C:\local\Tomcats\apache-tomcat-8.5.51.
Create a new folder where you will keep all your web application deploys, like C:\local\Deploy.
In Eclipse, while in the "Java Perspective", show the "Servers" view from "Window > Show View > Other… > Server > Servers".
You will see the link "No servers available. Click to create a new server…". Click that link. You will see a dialog
where you should choose "Apache > Tomcat v8.5 Server". In the Next dialog choose your "Tomcat installation directory",
for example C:\local\Tomcats\apache-tomcat-8.5.51, and finish.
Just to be safe, check that Tomcat works by running it and browsing to http://localhost:8080/. If all is fine, you should see
an error from Tomcat:
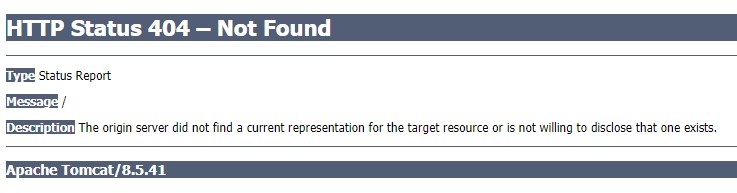
Stop Tomcat then right-click on it and choose "Open". You will see the Overview:
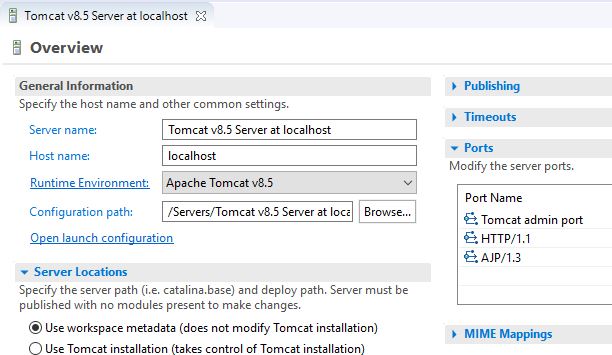
On this page do the following:
-
Under "Server locations" set "Use custom location > Server path" to
C:\local\Deploy\myProjectwhere "myProject" is anything you like -
Under "Server Options" uncheck "Modules auto reload by default"
-
Under "Timeouts" add a trailing 0 to both timeouts so that 45 becomes 450 and 15 becomes 150
-
Save with CTRL+S.
If your sources in the "Package Explorer" window don’t have any red marks (no compilation errors), you can add the web application to Tomcat:
-
Right-click on the Tomcat server in the "Servers" view
-
Select "Add and Remove… > Add All >>"
If the server starts with no errors, you can see the homepage placeholder at http://localhost:8080/
Embedded Tomcat
This section is about running the embedded Tomcat server.
|
You can skip this section if you’re going to use the standalone version of Tomcat. |
The application is started by running the net.yadaframework.core.YadaTomcatServer class.
It accepts two mandatory arguments and an optional one:
- acronym+environment
-
a string that will be used by the shutdown command
- webapp folder
-
relative path of the webapp folder in eclipse ("src/main/webapp"), or the full path elsewhere
- temp folder
-
optional in Eclipse, it must be the full path of the temp folder for Tomcat data (where the war is exploded)
When the last argument is missing, "developer mode" is assumed and the HTTPS connector is enabled. It’s not
enabled in all other environments because HTTPS is supposed to be handled by Apache.
The YadaTomcatServer class can be overridden or rewritten to achieve a different behavior.
The command line to start the application on the developer PC is something like
java net.yadaframework.core.YadaTomcatServer ybsdev src/main/webappThis can be easily added in Eclipse as a "Java Application" entry in the "Run Configurations" dialog.
After running the server, point the browser to http://localhost:8080/ in order to see a skeleton home page.
Troubleshooting
Compilation Errors
In case of compilation errors, the first thing to do is to run a "Refresh Gradle Project" on the affected project or the including project. If errors persist, check that you have imported all the needed Yada projects. Also be sure to have "Projects > Build Automatically" checked and try with a "Project > Clean…".
Validation Errors
If you get an error like
CHKJ3000E: WAR Validation Failed: org.eclipse.jst.j2ee.commonarchivecore.internal.exception.DeploymentDescriptorLoadException: WEB-INF/web.xml
you may fix it just by forcing a validation on the project via the menu.
Tomcat Startup Errors
If Tomcat doesn’t start, it might have stale data. Try with a "Clean…" on the server. If everything fails, stop the server and delete the content of the Deploy folder,
for example C:\local\Deploy\myProject. Then do a "Publish" on the server. If you can’t delete some file because Windows says it’s open, you’ll need to quit Eclipse
and be sure that there are no ghost Tomcat processes running. In extreme cases, you might need to restart your PC.